DIY Stucco Interior: A Step-by-Step Guide
Are you looking to add a touch of rustic elegance and unique texture to your home’s interior? DIY stucco interior walls might be the answer you’ve been searching for. Stucco is not just for exteriors; it can also create stunning and visually captivating indoor spaces. In this blog post, we’ll provide you with a step-by-step guide to transforming your space with DIY stucco interior walls, helping you achieve a look that’s both distinctive and inviting.
Materials You’ll Need
Before starting your DIY stucco interior project, gather the following materials:
Step-by-Step Guide to DIY Stucco Interior
Step 1: Surface Preparation
- Clean the wall surface to remove any dirt, dust, or debris.
- Repair any cracks or holes in the wall. Apply a bonding agent to ensure the stucco adheres properly.
Step 2: Mixing the Stucco
- Follow the manufacturer’s instructions to mix the stucco mixture. Aim for a peanut-butter-like consistency.
- If you want to add color, you can mix in pigments or colorants at this stage.
Step 3: Applying the Stucco
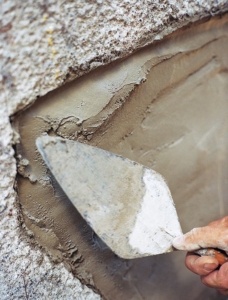
- Using a trowel, apply the stucco mixture evenly to the wall. Start from the bottom and work your way up.
- Create the desired texture by using different trowel techniques, such as swirling, stippling, or using a sponge for a sponge-finish texture.
- Allow the first coat to dry according to the manufacturer’s instructions.
Step 4: Applying Additional Coats
- If desired, apply additional coats of stucco to achieve the desired thickness and texture. Each coat should be applied in a crosshatch pattern for even coverage.
- Allow each coat to dry before applying the next.
Step 5: Finishing Touches
- Once the stucco is fully dry, you can add a coat of paint or sealer to customize the color and protect the finish.
Tips and Considerations
- Work in small sections to ensure even coverage and consistent texture.
- Experiment with different trowel techniques to achieve the look you want.
- Practice on a small, inconspicuous area before tackling larger walls.
- Protect adjacent surfaces and floors with drop cloths and plastic sheeting.
- Follow safety precautions, such as wearing protective gear like gloves and goggles.
- Be patient; the stucco will take time to dry fully.
DIY stucco interior walls can transform your space into a visually stunning and unique environment. By following this step-by-step guide and being patient and meticulous with your application, you can achieve a beautifully textured and customized look that adds depth and character to your home’s interior. Enjoy the process and the satisfaction of creating a space that’s uniquely your own.


